Article: What Happens When You Combine Different Pleats?

What Happens When You Combine Different Pleats?
This post is the culmination of the basic pleating principles I have covered in the last three blog posts. The importance of understanding this post is to help you identify the different types of pleating used by others and how they incorporate pleating into their designs. Furthermore, if you are a fashion designer, it will help you to clearly communicate your ideas to pleating contractors such as ourselves.
Now that you know the three basic components of pleating styles and panel shapes, let’s put them together and see what we come up with. Below we have a picture of the three basic pleats:
Combining The Three Basic Pleating Styles with Panel Shapes
If we apply each of these pleating styles to the square/rectangular panel shape, the results are the following panels:
If we apply them to the sunburst (or half circle) panel we get the following:
If you were to request a side pleat or box pleat, etc. the default understanding is that you are referring to a straight panel shape, meaning the size of the pleat will be the same throughout the entire distance of the pleat. You must specify that you want a sunburst panel in addition to the pleat type. Typically, people will call and ask us “How much is it for sunburst pleating?” Our response is always “Which one?” However, the industry standard is accordion. If you look at what is on the market, you will see accordion is the most prevalent but that’s mainly because people are unaware of their options. So, when you call us you can ask for sunburst side-pleat, sunburst box-pleat or sunburst accordion pleat.
Combo-pleating: Combining Pleating Styles Within the Same Panel
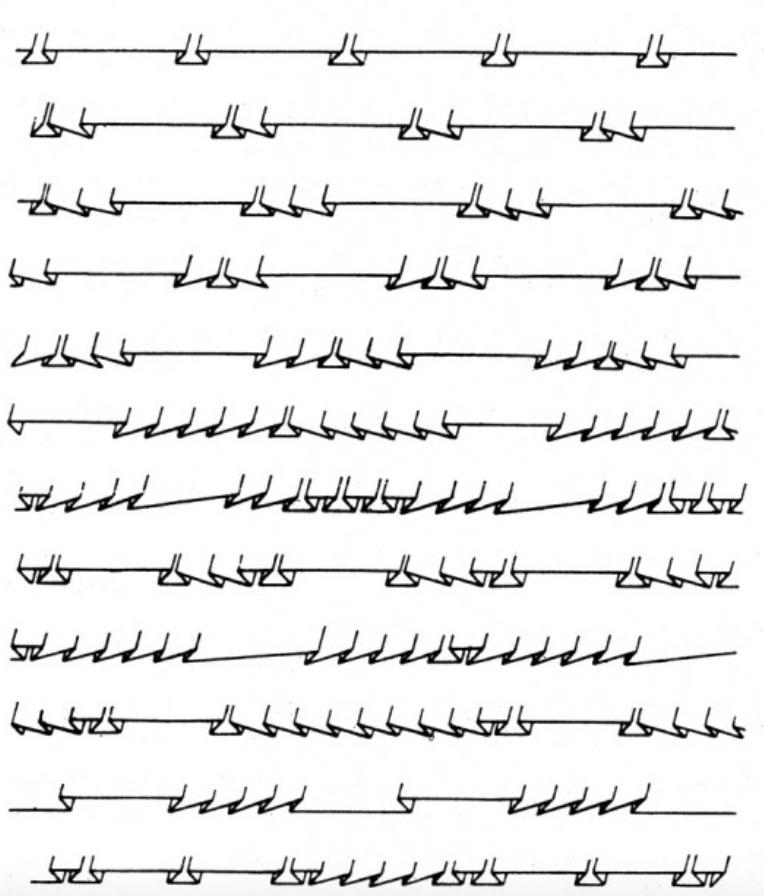
Another factor you should be aware of is that you are not limited to just one pleating style in a garment. You can mix up the three different styles of pleating into various combinations; hence the term “combo-pleating.” This results in numerous possible combinations. For example, below you will find some variations that can be made by the combination of different pleating styles. These images can be found in our How To Use Machine Pleating PDF.
The images above illustrate only a fraction of the possible variations. The purpose of this post is not to catalog every possible variation, but rather to make you aware of the endless possibilities.
Combining Everything You Have Learned
Now imagine the variations when you combine all of the information from this post and the last three:
- The basic types of pleats
- The basic panel shapes
- Rearranging and inverting the basic pleat styles in one panel
With the following additional variables:
- Size of the pleat
- Quality of fabric
- Types of hems
The looks you can create are virtually limitless.
I want to emphasize again how important this particular post is. It ties together several basic pleating principles into workable concepts and is the foundation for future posts that will build on these principles. If I was to compare these lessons to the English language, I would say that up to this point you have learned the letters and how to form words – next on the list is grammar. In order to create sentences, you must understand the rules of grammar. This also applies to using pleating or any other technique for that matter. You must understand the rules that govern it. For us, we will be learning the rules of pleating, how they interact with the characteristics of different fabrics, and how these apply to the rules of garment construction.


